How To Guide: Build a GPT-3.5 Powered Telegram Bot Using Only AI Tools
Mar. 14, 2023🐬 TL;DR
I tried to create an open-source Telegram bot that functions as a smart assistant, using only AI tools, such as OpenAI GPT-x, DALL-E, and Notion AI, wherever possible throughout the end-to-end process.
- Check out the project on GitHub.
- Try SavvyAI Telegram bot, and let me know what you think!
- Conclusions
Table of Contents
Intro
OpenAI’s GPT and Large Language Models (LLMs) have been widely discussed in the past few months. On March 1st, OpenAI released their gpt-3.5-turbo model, which is expected to be ten times cheaper than the previous generation, and the Whisper API for audio transcription, which also appears relatively inexpensive. On March 14, OpenAI announced GPT-4, a much larger and more expensive model, offering greater accuracy and a higher level of creativity, but currently not available for everyone (as of this writing).
While a technological shift is clearly happening, the field appears highly competitive. Even though my plan is not to build a business out of this right now, I wanted to understand what the technology can do by actually working with it. In this project, we’ll make a simple assistant as a Telegram bot, but with a twist - we will try to use as many AI tools as possible, starting from naming and ending with code and documentation. Let’s get started!
🛠️ Tooling used
- OpenAI Ghat GPT 3.5 Turbo (pay as you go)
- Notion AI (
Free→ 10$/month) - OpenAI DALL·E 2 UI (Free)
- MidJourney Discord ($10/month)
- VS Code with Co-Pilot ($10/month)
- Render.com ($7/month)
- Grammarly for spellchecking (Free)
🪧 Naming
Let’s begin with naming. We will be using chat.openai.com to conduct most of the conversations.
Q: Generate a name for a shopping assistant that sounds approachable and easy to remember.
How about "Savvy Shopper"? It's a catchy name that implies the assistant is knowledgeable and smart when it comes to shopping, and it's easy to remember due to the alliteration. Another option could be "Shop Buddy" which implies the assistant is a helpful friend who can guide you through your shopping experience.
Q: Please provide me with ten options.
1. Shop Genie
2. Bargain Buddy
3. Shopper's Helper
4. Shopper's Ally
5. Shopper's Guide
6. Shopper's Choice
7. Shopper's Pal
8. Shopper's Hub
9. Shopper's Delight
10. Shopper's Haven
Q: Give ten additional options that do not include the word “shop” in the name.
Certainly! Here are 10 more options for a shopping assistant name without the word "shop":

1. Thrive Assistant
2. EasyBuy Companion
3. Smart Cart
4. Frugal Friend
5. SpendWise
6. Budget Buddy
7. Deal Navigator
8. WiseBuy Assistant
9. Cart Companion
10. PricePal
Out all of the options “Savvy” or “SavvyAI” stands out. Let’s keep it.
Naming experience: ⭐️⭐️⭐️⭐️⭐️⭐️⭐️⭐️✨✨ (8/10)
🎨 Logo
We will try several tools and see which ones look good.
Trying DALL·E 2:
Q: Create an icon logo for an AI assistant named “Savvy” that helps people find products that meet their needs. The logo should be approachable and not include any text.
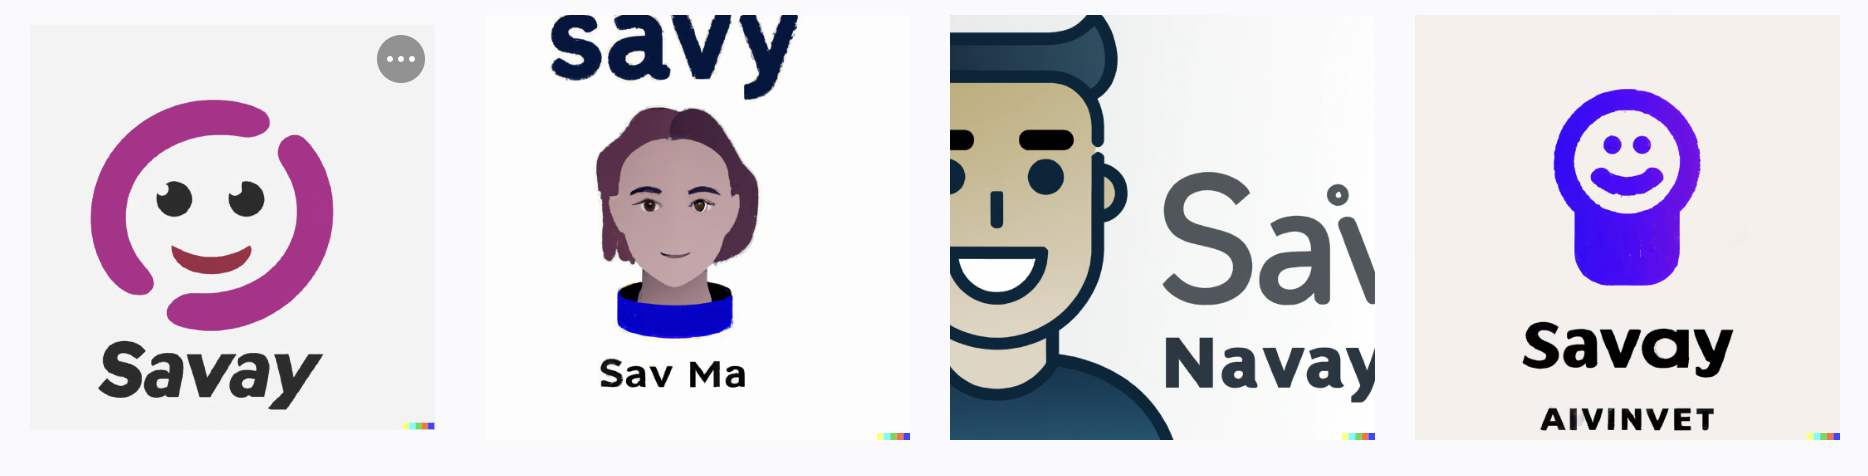
The results are very generic, and the bot’s name on the logo is also generic, which is the opposite of what was requested. Instead, let’s use MidJourney.
I read that the best way to achieve good results is to reference a designer or a firm and define the style. I chose the brand’s designer, responsible for the most recognizable brands. We all know hundreds, if not thousands, of brands, but how can we find the branding agencies responsible for them? This sounds like our next query.

Q: List the top 10 branding agencies and 5 top brands they did work for each agency.
1. Interbrand: Apple, Coca-Cola, Toyota, Mercedes-Benz, Samsung
2. Landor: FedEx, BMW, P&G, Shell, Citi
3. FutureBrand: Nespresso, Vodafone, Intel, Rolls-Royce, Nestle
4. Siegel+Gale: American Express, Dell, Pfizer, World Wildlife Fund, 3M
5. Brand Union: Ford, HSBC, Coca-Cola, Nestle, Unilever
I want the logo to be flat, featuring an approachable character named “Savvy.” I query again:
Q: Flat vector logo of an AI assistant imaginary cartoonish character, very approachable and friendly, minimal graphic, by Sagi Haviv
That generates a lot of robots, but I want something more humanistic.
Q: Flat vector icon logo of a personal assistant imaginary cartoonish character, very approachable and friendly, minimal graphic, by Chermayeff & Geismar & Haviv

Unfortunately, all imaginary assistant characters are depicted as human and primarily female-looking, which can be seen as a gender bias. Seeing a wider variety of imaginary assistants, including non-human characters, would be more interesting. Perhaps animals could be a good option. They can be approachable and friendly and still have a reference to the real world. Let’s ask LLMs about this and see what they suggest.
Q: What are some animals that are approachable, friendly, and smart?
There are several animals that are known for being approachable, friendly, and smart. Here are a few examples:
1. Dogs: Dogs are known for being very friendly and loyal animals. They are also highly intelligent and can be trained to perform a wide range of tasks.
2. Dolphins: Dolphins are highly social animals that are known for being very friendly and approachable. They are also very intelligent and have been observed demonstrating problem-solving and communication skills.
3. Elephants: Elephants are highly intelligent animals that are known for their social and empathetic behavior. They have been observed displaying remarkable problem-solving skills and can even demonstrate self-awareness.
4. Parrots: Parrots are highly intelligent birds that are known for their ability to mimic human speech and perform a wide range of tricks. They are also very social animals and can form strong bonds with their owners.
5. Bonobos: Bonobos are highly social primates that are known for their friendly and empathetic behavior. They have been observed displaying remarkable problem-solving skills and can even demonstrate a basic understanding of language.
I love dolphins. Let’s try a new one:
Q: vector logo of an approachable and friendly dolphin-like imaginary character, by Landor & Fitch, –v 4

Final:
![]()
I am unsure if it’s in vector or flat format, but I like it.
Logo design experience: ⭐️⭐️⭐️⭐️⭐️⭐️⭐️⭐️✨✨ (8/10)
👩💻 Code
I plan to use ChatGPT and GitHub Co-pilot to create a project structure for a Telegram bot in Python. I chose Python because OpenAI has a Python library.
✉️ Telegram bot logic
Q: What is the code project structure for a Telegram bot in Python?
The code project structure for a Telegram bot in Python may vary depending on the developer's preferences and requirements. However, here is a basic template for the project structure:

- `bot.py`: This file contains the main code for the Telegram bot, including the bot's token, the commands, and the bot's responses to user input.
- `config.py`: This file contains any configuration variables or constants used in the bot.py file, such as the API key for external services.
- `utils.py`: This file contains any helper functions or utility classes used in the bot.py file.
- `requirements.txt`: This file lists all the Python packages required for the bot to run, including their versions.
- `README.md`: This file contains information about the bot, such as how to run it and how to contribute to the project.

It is important to note that this is just a basic template and the project structure may vary depending on the complexity of the bot and the developer's preferences.
Q: What is the best Python library for creating a Telegram bot, and how do you install it?
The `python-telegram-bot` library is a popular and widely used library for creating Telegram bots in Python. It provides an easy-to-use interface to interact with the Telegram Bot API.

To install the `python-telegram-bot` library, you can use pip, the Python package manager. Here are the steps:

1. Open your command prompt or terminal.

2. Type `pip install python-telegram-bot` and press enter.

3. The installation process will begin, and pip will download and install the library and its dependencies.

Once the installation is complete, you can import the library in your Python script and start building your Telegram bot.
Q: How can you create a bot on Telegram’s BotFather platform?
1. Open the Telegram app and search for "BotFather" in the search bar.

2. Click on the BotFather profile and start a chat by clicking on the "START" button.

3. Type "/newbot" command to create a new bot. Follow the instructions given by BotFather which will include providing a name for your bot and a unique username.

4. After providing the name and username, BotFather will generate a token for your bot. This token is required to authenticate your bot with Telegram's API.

5. Save the token in a secure place, as it will be used in your bot's code to connect to Telegram's API.

6. Customize your bot by setting a profile picture and other optional settings using the commands provided by BotFather.

7. Start developing your Telegram bot using the Telegram Bot API and the programming language of your choice.

That's it! Once you have created your bot and obtained the token, you can start building your bot's functionality using the Bot API. You can find more information on how to use the Telegram Bot API in the official documentation: https://core.telegram.org/bots/api
Let’s make Savvy a little bit funny and start with an introductory joke:
Q: I am creating an AI chatbot for Telegram. Can you help me develop a quirky and funny introduction message for the bot that conveys its helpfulness?
Welcome to the wacky world of [Your Chatbot's Name]! I'm here to be your digital sidekick, your virtual bestie, your AI amigo. Think of me as your personal genie, except instead of granting wishes, I'll help you with anything from finding the nearest pizza joint to telling you a silly joke. So, what can I do for you today, oh master of the keyboard?
Q: The bot’s name is Savvy. Please make the introduction shorter.
"Hey there! I'm Savvy, your new chatbot buddy. Need a funny joke or a random fact? Just ask! I'm here to be your digital assistant, your AI pal, your pocket-sized problem solver. So, what can I do for you today?”
☁️ Deployment
I need something simple for deployment that does not require a lot of configuration.
Q: What are the best PaaS to deploy a simple Telegram bot?
There are several PaaS (Platform as a Service) options available to deploy a simple Telegram bot. Here are some popular ones:

1. Heroku: Heroku is a cloud-based service that supports multiple languages, including Python. It's easy to set up and deploy your bot to Heroku. Heroku also has a free tier, which makes it a popular choice for small projects.
2. AWS Elastic Beanstalk: AWS Elastic Beanstalk is a service that makes it easy to deploy, manage, and scale web applications, including Telegram bots. It supports multiple languages and frameworks, including Python.
3. Google App Engine: Google App Engine is a PaaS offering from Google that supports multiple languages, including Python. It's easy to set up and deploy your bot to App Engine. App Engine also has a free tier, which makes it a popular choice for small projects.
4. DigitalOcean App Platform: DigitalOcean App Platform is a PaaS offering from DigitalOcean that supports multiple languages, including Python. It's easy to set up and deploy your bot to App Platform. App Platform also has a free tier, which makes it a popular choice for small projects.
5. Render: Render is a cloud-based service that supports multiple languages, including Python. It's easy to set up and deploy your bot to Render. Render also has a free tier, which makes it a popular choice for small projects.

Ultimately, the best PaaS for your Telegram bot depends on your specific needs and preferences. Consider factors such as ease of use, cost, scalability, and community support when choosing a PaaS.
Here is an excellent example of how the amount of accessible information on the web impacts the results of a prompt. GCP and AWS will be on any list for a similar question because there is much information about them online. However, they may not be simple enough for my case.
Q: I like render.com. How do I deploy my bot to render.com?
Great choice! Here's a step-by-step guide on how to deploy your Telegram bot to Render:

1. Create an account on Render.com and log in to the dashboard.
2. Click on the "New +" button on the top left corner of the dashboard and select "Web Service".
3. On the "Create New Web Service" page, select "Custom" as the environment and "Python" as the language.
4. Under the "Git Repository" section, connect your GitHub or GitLab repository that contains your bot code. Alternatively, you can upload your code manually.
5. Under the "Build Command" section, enter **`python bot.py`**.
6. Under the "Environment Variables" section, add the environment variables required for your bot to run, such as your Telegram API token. You can click on the "Add Env Var" button to add each variable one by one.
7. Under the "Ports" section, add a new port mapping with "TCP" as the protocol and "8443" as the port.
8. Click on the "Create Web Service" button.
9. Once the service is created, click on the "Deploy" button to deploy your bot.
10. Wait for the deployment to finish, and then click on the "Open App" button to test your bot.

That's it! Your bot should now be up and running on Render. You can test it by sending a message to your bot on Telegram. If you encounter any issues, you can check the logs on Render to debug your code.
Oh, I don’t think I committed anything to Git. Let’s figure out how to do that. Obviously, I know how to do this, but we’re trying to depend on AI tools for as much as possible during this process.
Q: How do I create a GitHub repository and make my first commit?
Here's a step-by-step guide on how to create a GitHub repository and make your first commit:

1. Go to GitHub.com and sign up for an account if you haven't already.
2. Once you're logged in, click on the plus (+) icon on the top right corner of the screen, and select "New Repository".
3. On the "Create a new repository" page, give your repository a name and a description. You can also choose whether to make your repository public or private.
4. Once you've entered the details, click on the "Create repository" button.
5. On the next page, you'll see instructions for creating a new repository on the command line. Follow the instructions to create a new local directory for your repository, initialize it as a Git repository, and connect it to the GitHub remote.
6. Once you've set up your local repository, create a new file in your local repository directory and add some code to it. For example, you could create a file called "bot.py" and add some code for your Telegram bot.
7. Once you've added some code, use the **`git add`** command to stage the changes. For example, if you've added a file called "bot.py", you can use the command **`git add bot.py`**.
8. Use the **`git commit`** command to commit the changes to your local repository. For example, you can use the command **`git commit -m "Initial commit"`**.
9. Finally, use the **`git push`** command to push your changes to the remote repository on GitHub. For example, you can use the command **`git push origin main`**.

That's it! You've now created a new GitHub repository and made your first commit. You can continue to add more files and make changes to your code, and use Git commands to commit and push those changes to the remote repository on GitHub.
I understand that committing API keys to Git is not a great idea. Let’s figure out how to avoid doing that.
Q: Imagine I have config.py with sensitive data. How do I avoid committing it to git?
To avoid committing sensitive data such as API keys, passwords, or other confidential information to your Git repository, you can use a **`.gitignore`** file to exclude the file(s) from version control.

Here's how you can do it:

1. Create a file called **`.gitignore`** in the root directory of your repository if you don't already have one.
2. Open the **`.gitignore`** file in a text editor and add the name of the file(s) that you want to exclude from version control. For example, if you have a file called **`config.py`**, add the following line to the **`.gitignore`** file:
3. …

Instead, you can create a separate file to store your sensitive data, such as a **`.env`** file, and add it to the **`.gitignore`**file. Then, you can read the values from the **`.env`**
  file in your code using a library such as **`python-dotenv`**
Q: How to generate CLI commands for creating the first commit?
git add bot.py
git commit -m "Initial commit"
git push origin main
Q: Give me an example of how to use .env with the dotenv library in Python.
Sure! Here's an example of how to use **`.env`**, **`.env.sample`**, and **`python-dotenv`** in Python:

Let's say you have a Python script that requires an API key to access some external service, and you don't want to store the API key directly in your script or commit it to your Git repository. Here's how you can use **`.env`**, **`.env.sample`**, and **`python-dotenv`** to manage your environment variables:

1. Create a **`.env.sample`** file in the root directory of your project. This file should contain a list of the environment variables required by your script, along with example values. For example: `API_KEY=your-api-key-here`
Let’s create a placeholder for the README.md file.
Q: Create a boilerplate for README.md in markdown for the SavvyAI Telegram bot.
Let’s start the app. However, there seem to be some issues. It appears that we need to consult the documentation.
updater = Updater(token=TELEGRAM_BOT_TOKEN, use_context=True)
              ^^^^^^^^^^^^^^^^^^^^^^^^^^^^^^^^^^^^^^^^^^^^^^^^^^^
TypeError: Updater.__init__() got an unexpected keyword argument 'token'
It seems that the example provided was for the previous library version. We will refer to the examples in the official documentation to fix the app.
Let’s get back to deployment. Render prefers running the app in a Docker container, but I used pipenv. Let’s figure out how to create a Dockerfile:
Q: If you want to run a bot.py file with pipenv in a Docker container, what would the Dockerfile look like?
# Use an official Python runtime as a parent image
FROM python:3.9-alpine

# Set the working directory to /app
WORKDIR /app

# Copy the Pipfile and Pipfile.lock to the container
COPY Pipfile Pipfile.lock ./

# Install pipenv and dependencies
RUN apk add --no-cache --virtual .build-deps gcc musl-dev && \
    pip install pipenv && pipenv install --system --deploy && \
    apk del .build-deps

# Copy the bot.py script to the container
COPY bot.py .

# Run the bot.py script with pipenv
CMD ["pipenv", "run", "python", "bot.py"]
Let’s start the Docker container. We have the TELEGRAM_BOT_TOKEN env variable. How to run the container with it?
Q: How to run Docker with an environment variable called TELEGRAM_BOT_TOKEN?
For example, to run a Docker container with **`TELEGRAM_BOT_TOKEN`** set to a token value of **`your_token_value`**, you can use the following command:


docker run -e TELEGRAM_BOT_TOKEN=your_token_value my_image
Great! There are a few issues in the console that ChatGPT can help address, and the bot is finally running with the image.
Alright, let’s try deploying it using Render. Yay, it’s working!

🤖 OpenAI GPT API integration
Let’s connect with Open AI’s latest model, gpt-3.5-turbo, and use GhatGPT to ask about it.
Q: How do I connect the latest OpenAI GPT-3.5-Turbo model with Python?
1. Install the OpenAI API client:
2. Set your OpenAI API key as an environment variable:
3. Import the OpenAI API client and create a new instance:
4. Retrieve the latest GPT-3.5 Turbo model ID:


model_id = openai.Model.list(engine="davinci-3-5-turbo")["data"][0]["id"]
The instructions are helpful overall, but there is an issue with the model name, which appears to be invalid. It does not seem to recognize the most recent model, which has the proper name of gpt-3.5-turbo. Instead, let’s refer to the documentation for more information. Specifically, we will focus on the completion API.
Q: How do I get an OpenAI API key?
To get an OpenAI API key, follow these steps:

1. Create an account on the OpenAI website: Go to beta.openai.com/signup/ and sign up for a new account.
2. Choose the API plan that best suits your needs: OpenAI offers several different API plans, ranging from a free tier with limited access to a paid tier with more features and higher usage limits. Choose the plan that best suits your needs and budget.
3. Generate an API key: Once you have signed up and chosen your plan, you can generate an API key by going to the "API Keys" section of your account dashboard. Click on "Generate New Key" and copy the key that is generated
OpenAI is set up. Let’s process user messages through Telegram and pass them to the OpenAI API.
Q: How to consume any test user sent in the Telegram bot using python-telegram-bot?
To consume a message sent by a user in a Telegram bot using the **`python-telegram-bot`**
library, you can use the **`MessageHandler`**
class in combination with a function that handles the incoming messages.

{some helpful code here}
We have encountered errors while attempting to use the message handling code suggested. Even with suggestions from Co-Pilot, it seems like errors persist. It may be necessary to refer to the documentation of the Telegram Bot library to resolve these issues.
Let’s add chat completion logic to the bot.
Q: How to generate a completion using the OpenAI Python library?
import openai
openai.api_key = "YOUR_API_KEY"

# Set up the request parameters
prompt = "The quick brown fox"
model = "davinci"
temperature = 0.5
max_tokens = 50

# Generate the completion
response = openai.Completion.create(
  engine=model,
  prompt=prompt,
  temperature=temperature,
  max_tokens=max_tokens
)

# Extract the generated text from the response
output_text = response.choices[0].text

print(output_text)
But I’m getting an error:
openai.error.InvalidRequestError: This is a chat model and not supported in the v1/completions endpoint. Did you mean to use v1/chat/completions?
Q: I am receiving an error message that says, “openai.error.InvalidRequestError: This is a chat model and is not supported in the v1/completions endpoint. Did you mean to use v1/chat/completions?”
The output contains a specific `chat=True` parameter that i need to add to generate a chat completion:

response = openai.Completion.create(
    engine=model,
    prompt=prompt,
    temperature=temperature,
    max_tokens=max_tokens,
    chat=True
)
Getting an error again:
openai.error.InvalidRequestError: Unrecognized request argument supplied: chat
Oh no, not again. Let’s go to the documentation once more. After diving deeper into the documentation, the issue was finally resolved, and now the bot can generate responses using the OpenAI GPT API.
👂 Whisper API integration
Q: How can I integrate the Whisper API from OpenAI using Python?
To integrate the OpenAI's Whisper API using Python, you can follow the below steps:

1. First, you need to have an API key for OpenAI. You can get the API key by signing up for OpenAI's beta program at https://beta.openai.com/signup/.
2. Once you have the API key, you can install the OpenAI package using pip. Open the command prompt and enter the following command:
3. After installing the package, you need to import the OpenAI package in your Python code:
4. Set the API key using the **`openai.api_key`** method. For example:
5. Now, you can use the OpenAI's Whisper API by calling the **`openai.Completion.create()`** method. For example:


prompt = "What is the capital of France?"
response = openai.Completion.create(engine="text-davinci-002", prompt=prompt, max_tokens=1)
print(response.choices[0].text)
The response is completely off. GhatGPT does not know about Whisper API, not understands that Whisper API is speech to text.
Going back to reading documentation
It appears that to read a file from Telegram, FFmpeg is needed.
Q: How to Install FFMPEG in a Slim Docker Image?
RUN apt-get update && apt-get install -y ffmpeg
We needed to resolve some of the complications in the code, but the bit is finally ready to be tested.
That’s working!
User testing
I sent the bot to a few friends and family to test out in their own Telegram. Overall, the initial users had a great experience. My goal is to create an interface that is easy for people who are not in tech and are unfamiliar with Telegram bots.
One difficulty during testing was using a voice recording memo tool to pass a voice command to the bot. The usability is not superb, and that would probably require some onboarding.
Another issue that arose was around ideas for testing the bot. Users were struggling with what was possible because it was a new way of interacting with the internet and computer imagination.
Lastly, some users tried to continue the conversation after getting unsatisfactory results by adding more information, but in v1, each prompt was treated independently. This is our third to-do item for 1.2.
Here is a complete todo list of improvements for v1.1-1.2:
- Improve the onboarding experience by educating users on how to use voice commands.
- Add several examples of queries that you can ask Savvy.
- Introduce a way to store context using sessions.
v1.1 improvements
Regarding onboarding, I will try using Notion AI to generate the welcome message.
Q: A welcome message of an AI telegram bot called Savvy that can help people answer any generic question they would typically ask Google. Give them 4-5 short examples of queries like “tacos recipe” or " things to see in Kyoto.”
Hello! I'm Savvy, your personal AI assistant. I'm here to help answer any questions you may have, just like Google, but better with less noise. Here are a few examples of things you can ask me:

- "What's a simple recipe for tacos?"
- "What are some things to see in Kyoto?"
- “10 Ideas for a Novel by William Shakespeare”
- "How do I change a tire?"
- "How do I say 'hello' in Spanish?"

Don't hesitate to ask me anything!
🏎️ Rate limiting
Since the OpenAI API is limited to $120/month per individual account, we need to determine how to restrict initial usage to ensure that a sufficient number of people can try it if required.
Our target is 100 DAUs at a peak. Based on research with the help of OpenAI, it may be a good idea to use Redis to count the total number of tokens per user and implement a daily limit.
Based on current pricing as of March 2023, 1k tokens cost $0.002, with the total limit of OpenAI accounts being $120 monthly. Since we use the GPT and Whisper API bots, let’s allocate 50% of the budget to each.
This would take us to $60/0.002 = 30,000k tokens per month or 1,000,000 tokens per day. In the best-case scenario, if we have 100 daily active users (DAUs), each user will have 10,000 tokens. Therefore, each user can make roughly 20-30 API queries to understand the possibilities of the technology.
Whisper’s pricing is $0.006 per minute, and a $60/month plan would give us 10,000 minutes per month, or 300 minutes per day. Assuming we aim for 100 DAUs, each user would have 3 minutes, or about 180 seconds, per day.
Let’s explore the implementation and deployment with Redis involved.
Q: If I am counting the number of tokens per request per user and have a limit of total tokens per day, how do I implement rate limiting with Python and Redis?
import redis
import datetime

# Connect to Redis
r = redis.Redis(host='localhost', port=6379, db=0)

# Define the user ID, daily limit, and tokens per request
user_id = '12345'
daily_limit = 1000
tokens_per_request = 10

# Get the current date
now = datetime.datetime.now()

# Set the Redis key name to the user ID and date
key_name = f'{user_id}:{now.date()}'

# Increment the key and get the current total tokens for the user
total_tokens = r.incr(key_name, tokens_per_request)

# Set the expiration time for the key to the end of the day
expiration_time = datetime.datetime.combine(now.date(), datetime.time.max)
r.expireat(key_name, int(expiration_time.timestamp()))

# Check if the user has exceeded their daily limit
if total_tokens > daily_limit:
    print(f'User {user_id} has exceeded the daily limit of {daily_limit} tokens.')
else:
    # Calculate the remaining tokens for the user
    remaining_tokens = daily_limit - total_tokens
    print(f'User {user_id} has {remaining_tokens} tokens remaining for today.')
There are some good ideas here. We could replicate some of that code to implement rate limiting for the GTP and Whisper APIs.
When it comes to deployment, we currently have only one service. Render has something called render.yaml, similar to Terraform, at acts as infrastructure-as-code.
Q: If I have a background worker and a Redis service with render.com, how would render.yaml look like?
To set up a background worker and a Redis instance on Render.com, you would need to include the following in your **`render.yml`** file:

services:
  - name: redis
    type: redis
    plan: redis-small

background_workers:
  - name: worker
    command: python worker.py
    service: redis
There is no such group as background_workers. It is just a service with type=worker. Anyway, yet another reminder “trust but verify.” Let’s head to Render’s documentation.
After exploring the documentation for 5-10 minutes, we ended up with the following code:
services:
  # A Docker web service
  - type: worker
    name: telegram_bot
    env: docker
    plan: starter
    envVars:
      - key: REDIS_URL
        fromService:
          type: redis
          name: limits_store
          property: connectionString # available properties are listed below
      - key: TELEGRAM_BOT_TOKEN
        sync: false
      - key: OPENAI_API_KEY
        sync: false

  - type: redis
    name: limits_store
    plan: free
    maxmemoryPolicy: noeviction # optional (defaults to allkeys-lru)
It would be nice to test the configuration before committing. Is this even possible?
Q: How to test render.yaml without committing?
You can test your **`render.yml`** file without committing by using the Render CLI tool, which allows you to preview your configuration locally.

To preview your configuration, follow these steps:

1. Install the Render CLI tool by following the instructions in the Render documentation.
2. Navigate to the root directory of your project and run the following command:

    ```
    render preview
    ```

    This command will generate a preview of your application configuration based on your **`render.yml`** file.

3. Review the output of the **`render preview`** command to ensure that your configuration is correct. The preview will show you how your services and other resources will be provisioned on Render.com.

    Note that the **`render preview`** command does not actually create any resources on Render.com. It simply generates a preview of your configuration.

4. If you need to make changes to your configuration, update your **`render.yml`** file and run the **`render preview`** command again.
So far, I like Render! However, the real CLI tool does not have such a command, so the only quick way to test it was to commit the code. After one iteration, Savvy is up and running!
Documentation
Okay, the final step is to update the documentation in the Readme and make the repository public. You can use Co-Pilot to assist in completing the instructions in README.
Coding experience: ⭐️⭐️⭐️⭐️⭐️⭐️✨✨✨✨ (6/10)
📝 Writing a blog post
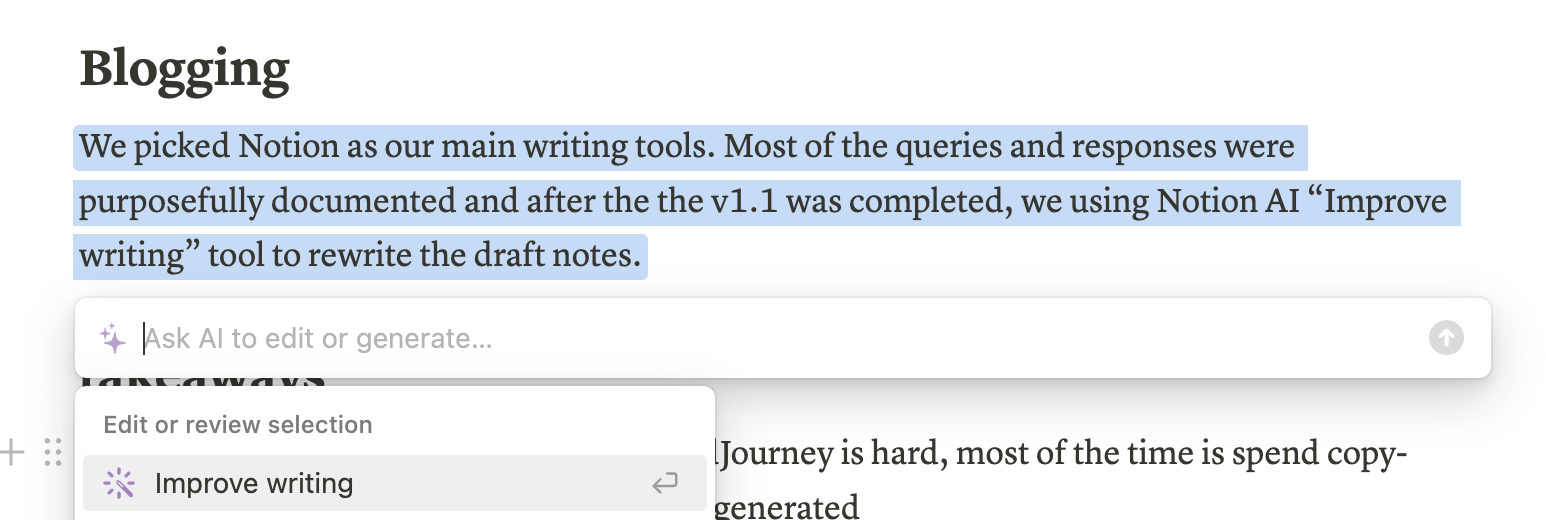
We chose Notion as our primary writing tool. Most of the queries and responses were intentionally documented. After completing version 1.1, we used the “Improve Writing” tool in Notion AI to revise our draft notes.
Experience writing: ⭐️⭐️⭐️⭐️⭐️⭐️⭐️⭐️⭐️✨ (9/10)
Conclusions
Learning new habits is so much fun! This time, instead of using Kagi, I used ChatGPT for any questions I had, even if I knew the answer. It helped me drill down to potential solutions quickly, skipping the SEO-optimized noise of the web.
Unfortunately, over a dozen cases of “hallucination” occurred when ChatGPT generated code that did not work. Sometimes it would connect to an updated version of the library and library interfaces. At the same time, in other cases, it would just make things up, requiring me to refer to the documentation to figure things out.
On the creative side, iterating and switching ideas with MidJourney can be difficult due to the time spent copy-pasting and waiting for images to be generated in Discord. Although better tools for creatives, such as Alpaca, exist, we chose to keep it simple.
I frequently switched between VS Code, ChatGPT, documentation, and Discord (for Midjourney and DALL-E 2). An improved and consolidated workflow that minimizes context-switching would benefit me.
Final thoughts
LLMs will soon be ubiquitous. Resisting progress doesn’t make sense; instead, we should embrace it. Will the current version replace search engines and library documentation? Probably not. Did it save me time? I don’t think so. But it was fun to learn about its possibilities and especially its flaws. I believe future versions, like GPT-4, will be less flawed and more reliable. In the meantime, I will use “trust but verify” as a general principle when using LLMs.
Thank you for reading this lengthy post. Please try the bot and follow me on Twitter if you are interested in how this project will develop and hear more thoughts on the future of AI.